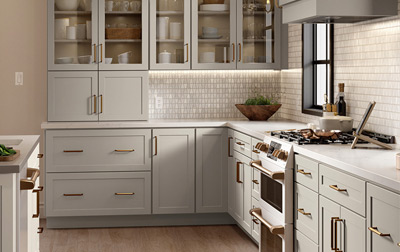
Kitchen Remodel Timeline: What To Expect During Renovation
Kitchen Remodel Timeline: What To Expect During Renovation
While all home renovations come with the possibility of delays and challenges, understanding the kitchen remodel timeline can increase your chances of a successful project. If you’re new to the process, then you might be surprised as to just how many stages are involved. Fortunately, we’ve developed a comprehensive ten-step guide designed to enlighten you with what to anticipate during each phase, so you can enjoy your dream kitchen on time and on budget.
Step 1: Preparing for the Remodel
The calm before the storm. Before demolition begins, there’s work you can do to jumpstart a smooth renovation. Begin by decluttering your kitchen to create a blank canvas for your dream to come to life. If you’re staying in your home during the remodel, then take time before the flurry of activity commences to establish a temporary kitchen space so you can fix meals throughout the disruption.
Use this opportunity to finalize your design and material choices, and make decisions about the appliances, materials, and color palette of your new kitchen. Doing all of this before the demo crew starts swinging hammers rather than during the renovation sets you up for a less stressful process, and a kitchen remodel experience that will meet or even exceed your expectations.
Step 2: Demolition and Removal
Things are about to get messy. It’s time for the demo crew to get to business, removing existing cabinets, countertops, appliances, and flooring to pave the way for your new kitchen’s layout. Whether you’re doing it yourself, or with the help of professionals, clarify ahead of time where the old items and materials will be going.
Local landfills may have restrictions on what can be dumped (and a fee may be required), while your community may have rules as to what can be left on the sidewalk, and for how long. Planning to donate items? Make sure your secondhand store accepts them before you haul them in. Having all this information ahead of time will keep your kitchen remodel moving right along.
Step 3: Structural Changes and Plumbing/Electrical Updates
Here is where any structural modifications you may have planned (e.g., moving walls, enlarging windows) will occur as your transformation starts to take shape. It’s also when any plumbing or electrical updates required for your new kitchen will occur.
This step typically requires the help of tradesmen who are best equipped to ensure wiring, plumbing, and foundational work goes smoothly. Failure to enlist the expertise of a trained professional at this stage may result in setbacks and delays in your overall timeline if work is completed improperly and needs to be redone.
Step 4: Installing New Cabinets and Countertops
Your dream kitchen will start to crystallize as the cabinet and countertop installations begin. The process involves careful measurements, ensuring that each cabinet fits seamlessly and serves its intended purpose. Expect the layout you envisioned to start taking shape, providing storage solutions that match your lifestyle. This phase melds the practical with the aesthetic, translating design concepts into functional reality.
Step 5: Flooring and Backsplash Installation
The flooring and backsplash contribute significantly to your kitchen’s character. However, the materials and designs of the elements you choose may increase or decrease your kitchen remodel timeline. When it comes to flooring, consider the following:
- Tiles: The installation of tiles may take up to three days. This duration accounts for surface preparation, precise layout, adhesive application, grouting, and sealing.
- Hardwood: Installing hardwood flooring typically takes around two to three days for an average-sized kitchen, and involves acclimatization, subfloor preparation, and the actual installation process.
- Laminate: Laminate flooring installation is often completed in about two to three days. The interlocking system simplifies the process, allowing for efficient installation.
Backsplash installation spans from a few days to around a week or more, considering factors including:
- Material Choice: Different materials dictate the timeline. Subway tiles, with their uniform size, might expedite the process, whereas intricate mosaics demand careful placement, potentially extending the duration.
- Pattern Complexity: Elaborate designs require more time for precise alignment and arrangement.
- Grouting: The choice of grout type and color adds an additional dimension. Grout application and curing contribute to the overall timeline.
Step 6: Appliance Installation
The kitchen’s functionality gets a major boost with the installation of appliances. Your team should be able to install your stove, refrigerator, dishwasher, and microwave on the same day, provided you are in possession of the appliances and your kitchen is properly configured (e.g., electrical wiring, plumbing, gas). If you’re handling this phase yourself then you may need more time than professionals who have done these installs hundreds of times. Making sure the hot and cold water, electricity, and gas are all hooked up properly and safely can get complicated, so if you’re in doubt, consider professional support.
Step 7: Lighting and Fixture Installation
It’s time for lighting fixtures to take center stage. Each lighting fixture contributes to the room’s character while promoting practicality. Installing lights shouldn’t take long, provided the kitchen is wired correctly.
- Overhead Lights: Installing overhead lights generally spans a few hours, depending on the number and design complexity. Proper wiring and fixture alignment ensure a well-lit space.
- Under-Cabinet Lighting: The installation of under-cabinet lighting typically takes around one to two hours. Precise placement is key to achieving the desired illumination.
- Pendant Lights: Installing pendant lights varies, taking approximately one to three hours per fixture. Intricate designs may require additional time.
The addition of kitchen hardware and faucets often happens at or around the same time as the lighting installation. This phase spans a few hours, encompassing installation and adjustment for seamless functionality.
Step 8: Final Touches and Cleanup
Finishing touches involve incorporating trim, molding, and paint touch-ups to eliminate any imperfections that might have emerged during the creation of your new kitchen. It’s a meticulous process that guarantees every element seamlessly melds together, culminating in the polished look you’ve always dreamt of.
Final touches go hand in hand with cleanup, which involves the following:
- Debris Removal: Removing construction debris, dust, and residual materials can be a labor-intensive but crucial step in unveiling the beauty of your kitchen.
- Deep Cleaning: Expect a thorough deep cleaning regimen involving wiping down surfaces, sanitizing, and polishing. Cabinets, countertops, appliances, and flooring require special attention to guarantee a spotless environment.
- Polishing and Shine: As a final touch, surfaces are polished to a gleaming finish. This includes fixtures, hardware, and any glass or metal components that require a lustrous shine.
At this stage, you’re now on the verge of enjoying your dream kitchen.
Step 9: Final Inspection and Approval
Here, contractors ensure every facet of your new kitchen adheres to building codes and safety standards. They scrutinize every detail, from structural integrity to electrical and plumbing systems, verifying that the remodel aligns with the prescribed guidelines.
As the homeowner, you’ll be asked to give your approval. Hopefully, you’ll be thrilled at the final result, even if there were hiccups along the way to achieving the kitchen you’ve always wanted.
Step 10: Enjoying Your New Kitchen
The moment you’ve been waiting for has arrived! Your newly remodeled kitchen is now ready to be enjoyed. Celebrate this milestone by embracing the functionality, beauty, and comfort your new space offers.
To maintain its charm, follow these maintenance tips that will keep your kitchen looking and working its best for years to come:
- Regular Cleaning: Use appropriate cleaning products for each surface to preserve their beauty.
- Preventive Measures: Utilize cutting boards and trivets to protect countertops and surfaces from wear.
- Hardware Maintenance: Keep cabinet handles and knobs clean and tighten them as needed.
- Appliance Care: Follow manufacturer guidelines for cleaning and maintenance of appliances.
- Grout and Sealant Inspection: Periodically inspect grout and sealants for any signs of wear or damage.
- Avoid Harsh Chemicals: Use gentle cleaning agents to avoid damaging surfaces.
- Stay Organized: Maintain an organized space to prevent clutter and facilitate easy cleaning.
- Address Repairs Promptly: If you notice any issues, such as loose tiles or dripping faucets, address them promptly to prevent further damage.
A kitchen remodel timeline is a roadmap to turning your vision into reality. By understanding the intricacies of each phase, you’ll be well-prepared to navigate the process smoothly. And if you need professional support as you embark on your kitchen remodel journey, get in touch. Schedule your free in-home design consultation today and discover how we can transform your kitchen in as little as 10 days!
Schedule your free design consultation
You also may like
![]()
Your ideal remodel, made real.
Why Us?
- 6-week* start-to-completion kitchen remodel
- 10-day* no-hassle installation process
- 0% APR financing for 12 months
- Operate locally but trusted nationally by homebuilders
Locations
- Inland Empire, CA
- Sacramento, CA
- Phoenix, AZ
*Exact installation timelines depend on product selection and scope of work.
**No payments are assessed during the 12-month promotion starting at approval, but interest is accruing; interest will be reversed if the loan is paid off by end of the promotion. If the loan is not paid off in promotion, installment payments begin based on risk-based APR between 14.99% and 23.99% for the remaining life of the loan.